Where to Place the Microwave in Your Kitchen Design

When our daughter was born no one we knew had a microwave much less considered one in their kitchen design. Three years latter when our son was born  nearly everyone had a microwave. They were much bigger than today’s designs. They were noisy and the cooking was uneven.

Today they are sleek, efficient and necessary for the modern kitchen. So where do you put the microwave? Here are some suggestions.

  1. Below the counter: Yes below the counter. It frees up counter space but it can be harder to load and small children can be a problem. Our youngest grandson is obsessed with the beep on the microwave. Luckily our is high and he cannot reach it.
  2. Built into the cabinets like a built in oven: The good thing is you can put it any height but it is hard to put into an existing kitchen. Make sure there is counter space near by to set a hot pan.
  3. Put it in an unused cabinet.… as if there is such a thing in modern kitchens: Many designs today can be put in a shelf built by removing a drawer or pair of drawers. If you find a space it is an easy retrofit. Leaving the door open and crumbs in the cabinet can be a problem. You will need to add electric and perhaps change the swing on the cabinet door.
  4. Over freestanding stove: Many microwaves designed for this application have built in exhaust fan making dual purpose.  You need to make sure the stove and microwave match in finish and design. The microwave might be too high for some users.
  5. In a corner of the countertop or in a corner cabinet: This solution can make use of a corner but it also create dead space and if exposed a place for dust and other kitchen debris to build up.
  6. In a butler pantry area instead of the kitchen cooking area: The advantage is it can be used for items such as coffee or side dishes and not interfere with main cooking area. If the butler pantry becomes a place to make coffee, breakfast or snacks it can become a second area that needs to be cleaned regularly.
  7. In appliance garage; This gets the microwave off the counter and out of site but it has the same disadvantages as putting it in a cabinet such as collecting crumbs.
  8. In the island: This has the same advantages and disadvantages of having it under the counter. It also can put the microwave out of site but be careful when designing in a island with a larger overhang so you do not make the oven difficult to use.
  9. Over a built in oven: This puts all the cooking in one area but may make the microwave too high or the oven too low for some users. It is also difficult to add unless you are replacing the cabinets.


See the pros and cons of locating your microwave above, below and beyond the counter

Source: 9 Places to Put the Microwave in Your Kitchen

Posted in Uncategorized | Comments Off on Where to Place the Microwave in Your Kitchen Design

How to Choose a Kitchen Sink to Compliment Your Design

There are a lot of options when you choose a kitchen sink. Here are some of the most common.

  1. Big single basin: These are becoming far more popular because the double bowl was invented so you could fill one side to wash dishes and rinse in the other side. With the advent of dishwashers and larger pans the double bowl has become less necessary and the single bowl more desirable. Be careful because some single bowls are so large they require larger customer sink base cabinets.

    Stainless Steel Sink

    6040 Drawn Stainless Steel Bowl

  2. Two bowls equal size: Often called a 5050 sink these are the biggest seller. They leave room for the faucet and are the easiest for the countertop fabricator to cut and install.
  3. Two unequal bowls: These come in two common configurations 6040 and 7030. They look good but have the disadvantage of having to offset the faucets because the big bowl is larger.
  4. Three basin: While these sinks look nice they might be too much of a good thing. They will often not fit in standard cabinets and require a large cutout in the countertop which weakens the top and makes it much harder to install the top without cracking or breaking. If a disposal is mounted in the center sink you cannot scrape food dir
    ectly from counter into sink.
  5. Zero Radius and VSR -very small radius – sinks are square with vertical sides. these have a very modern look. The countertop opening for Zero radius sinks are hard
    VSR-703

    Very Small Radius Sink 6040

    to cut and polish and are an excellent place for a crack to start. The VSR sinks have a small rounded corner but are otherwise the same as zero radius. Both the ZR and VSR sinks are hand made so sizes may vary slightly.  They have a very similar look once installed. Note there are some smaller radius sinks with the sides sloped instead of vertical. These are drawn bowls and are much less expensive but do not have the distinctive look of the VSR.

  6. Farm sinks: Farm sinks have a distinctive look but can have disadvantages. The front is lower than the surrounding countertop so they are more susceptible to water splashing over. They may also stick out past cabinets and be more prone to scratching. They require modification to the cabinets so they are harder to replace should your tastes. change.
VSR-3312A

Farm sink

Source: How to Choose the Right Kitchen Sink

Posted in Uncategorized | Comments Off on How to Choose a Kitchen Sink to Compliment Your Design

Checklist for remodeling your kitchen

Remodeling the kitchen which is the heart of your home can be stressful. It is best if you follow a plan like this kitchen remodel checklist below from start to finish even if you do it a step at a time. If you plan to put in cabinets, a new counter tops and a tile backsplash it is best to do in a specific order. You do not start with the tile and end with the cabinets or you will damage the previous steps.

If you are doing the remodel one step at a time over a long period of time consider and plan for the fact the tile or counter top you want may be discontinued by the time you get to that phase. Be flexible, for example, choose white tile rather than a specific white tile.

If you are  doing all your remodel at the same time remember this is the heart of you home. Where will you cook, store your food and eat? How long will the project take.

Ten step checklist for remodeling your kitchen:

  1. Consider what you need, want and can afford
  2. Set you budget
  3. Research and plan
  4. Find professionals you will need – even DYI project may need help from specialist such as electrician or plumber.
  5. Create rough plan – see item 2
  6. Make selection – cabinets, counter tops, appliances, faucet and sink, light fixtures, flooring, backsplash. decorative hardware – see item 2
  7. Get contractor estimates – revise item 2?
  8. Get ready for demolition
  9. Coordinate materials, labor and family!!!!!
  10. Make a list of unfinished items so you actually finish.


Source: Homeowner’s Workbook: How to Remodel Your Kitchen

Posted in Uncategorized | Tagged | Comments Off on Checklist for remodeling your kitchen

Changing your kitchen sink and faucet and other quick kitchen remodeling ideas

Houzz recently published an article on 19 projects the every homeowner should know about. The article lists the following items:

  1. Choose a new sinkthis article is very good on picking a style but fails to mention most of the sinks will not work unless you replace the countertop and possibly the cabinets in order to work. It also focuses of style and not the materials. When selecting a stainless steel sink for example you need to consider will it match your appliances and does it meet building code. Many stainless steel sinks on the market today do not meet code, use inferior production processes, will not match stainless steel appliances and are purchased solely on price. 
  2. Pick a new kitchen faucet – Picking a low lead faucet – is
    New head for 3029

    Eclipse Shasta faucet

    also important. Many faucets are called lead free but are not. Eclipse faucets are truly lead free and made to last a lifetime like granite.

  3. Install a new faucet – I am not sure why this is a separate item because if you select a new faucet let’s assume you are going to install it. Before you start to do your own faucet install please note there is likely a lot less room under your sink that shown in the pictures in the article. Also make sure you flush the existing water lines before you hook up your new faucet or any minerals or debris you shook loose when you disconnected to old faucet will plug up your new faucet.
  4. Resurface kitchen cabinets
  5. Paint your cabinets a new color
  6. Learn how to talk about cabinet door styles
  7. Choose new cabinet knobs and pulls
  8. Add toe kick storage
  9. Organize everything
  10. Build a mail and message center
  11. Keep your white space looking white
  12. Clean tile grout
  13. Clean you cutting board
  14. Get the right tools for the job
  15. Shop for appliances wisely
  16. Make a stand for tablets and cookbooks
  17. Make a funky charging station to hide all those wires.
  18. Install a kitchen back splash
  19. Add storage to your backsplash for hanging pots, pans and utensils.

Source: 19 Kitchen Projects Every Homeowner Should Know About

Posted in Uncategorized | Comments Off on Changing your kitchen sink and faucet and other quick kitchen remodeling ideas

Cool Kitchen Gadgets For Food Lovers

There are a lot of cool and unusual gadgets to add to your new kitchen design in addition to you new countertop and Lead Free faucet from ANO.

AD-The-Coolest-Kitchen-Gadgets-For-Food-Lovers-5-1

Tea Infuser

Tea Infuser

Tea Infuser

AD-The-Coolest-Kitchen-Gadgets-For-Food-Lovers-14

Egg Yoke Seperator

AD-The-Coolest-Kitchen-Gadgets-For-Food-Lovers-1 AD-The-Coolest-Kitchen-Gadgets-For-Food-Lovers-8 AD-The-Coolest-Kitchen-Gadgets-For-Food-Lovers-32


Here is the link to more:

Source: 50+ Of The Coolest Kitchen Gadgets For Food Lovers


Posted in Uncategorized | Comments Off on Cool Kitchen Gadgets For Food Lovers

The Problem with the Free Sink with Your Granite Tops

A few years ago some granite countertop fabricator began offering a free sink as an incentive. Some hid the cost in the price of the countertop. But nearly all looked for cheaper sinks because if you are giving away a free sink then the most important thing about the sink is not the quality but the price of the sink.

Stainless sinks are required by the major model codes in the US and Canada to be certified by an independent agency to meet ASTM112.19.3. This is an expensive process that includes testing in the factory and aftermarket.  A certified sink must be marked with the manufacturers name and the certifying agency. Most cheap sinks are not certified.

Sinks should be made of appliance grade 304 stainless steel so they match the appliances now and in the future. Many uncertified sink are made from unknown materials. It may look good out of the box but not match your appliances or hold up over time. Even some certified sinks are made from 301 stainless steel. 301 has less chromium so it will not be as lustrous and will not match appliances.  301 Stainless also has less nickel so it will age faster.

Most free sinks are double pressed so they are lighter which means they are will be noisier and do not resist denting.

Many free sinks are unbranded so there is no one to stand behind it if there is a problem.

If you install an uncertified sink and there is a problem it can only be replaced with a sink from the same manufacturer because the cut outs are manufacturer specific.

Here is a video except from a recent presentation we did for a customer.

https://youtu.be/vtKydBVQcyY

Posted in Uncategorized | Comments Off on The Problem with the Free Sink with Your Granite Tops

How to Clean, Shine, and Sanitize your Stainless Steel Sink!

ANO is often asked “How do I clean my Stainless Steel sink?” while we still stick by our answer – BarKeeper’s Friend and Scotch Bright Pad  – here is a third party solution.

Source: How to Clean, Shine, and Sanitize your Stainless Steel Sink! – The Creek Line House

Excerpt:

A couple of weeks ago I told you all about how I learned the right way to mop and how that makes such a big difference for me in getting my floors looking nice and clean. I also shared with you that I usually use my kitchen sink for this process instead of a mop bucket. Not surprisingly, a few readers were pretty concerned about whether or not that practice was safe and sanitary, so today I thought I’d tell you a little bit more about how I like to clean my stainless steel kitchen sink and sanitize it after I use it for heavy-duty cleaning like that.
I use my kitchen sink for almost all of my big cleaning jobs, just like it’s a big bucket of hot soapy water, but more convenient! So if I’m wiping down walls and cabinets, or doing any Spring (or Summ14sinkcleaning1er, Fall, or Winter) scrubbing, I use that sink. It actually doesn’t get used for dishes all that often since we got our new dishwasher about a year and half ago, because I just love that dishwasher! The sink does get used daily though and I actually clean it out and wipe it down several times a day. If it gets really in need of a good deep-cleaning itself or if I’ve done something like mopping the floors with it, here’s how I clean it afterwards!

So here’s my sink!

After being used for cleaning, rinsing off plates and dumping that last little bit of coffee out of the mugs for a few days, it can start to look pretty dingy.

I like to start out by filling it up with hot water and a few cups of vinegar.

Really hot water from your tap is often enough for cleaning, but if you really want to give it a good sanitizing, boil a big pot of water and dump that in there. If you’re using the hot water method of sanitizing, then your surfaces need to be in contact with water that’s 180 degrees for at least 30 seconds to kill off any unpleasant microorganisms. I love this method because it’s fast and it’s effective! Don’t hesitate to use a thermometer either! You might look crazy but at least you’ll know it’s really clean!

So I let the sink soak for a bit while the temperature of the water comes down. I take this time to grab an old toothbrush and scrub around the edges of the sink and the faucet.

I just dip the brush into the hot vinegar water and use that. Also, if I have any caked on mess, like ketchup that somehow managed to splash up onto the faucet, I take a rag, dip it into the hot water and just let it hang out on the mess for a minute to completely take it away.

Once the water in the sink has cooled, I pull the plug! I like to take my toothbrush again and get into the cracks around the drain and also get any grimeyness out of the drain itself.

I’m pretty sure that all those dark spots are all coffee stains from all the coffee we drink around here!

The next step is for those of us with old, well-worn sinks. If your sink gets dings and scratches in it like mine does, you can gently buff them out using one of these green scrubbies.

Next I take a damp rag and wipe down the whole sink, followed by a dry rag. At this point the sink always looks much better, but even if you think it’s much shinier than before, I guarantee that there’s still shining to be done!

The final step is to take some rubbing alcohol on your dry rag and go over the whole sink with it. This removes any greasy food residue that was hanging around after your soaking and scrubbing and it even further disinfects everything. So take your time and wipe down your faucet and the counter surrounding your sink too!

Here’s how it looks when I’m all done! Pretty great for an old sink, right?

So bright! So shiny!

So that’s how I clean my sink. You can see now why I’m not worried about a couple of floor germs! Do you use you sink for everything like I do?

Posted in Uncategorized | Comments Off on How to Clean, Shine, and Sanitize your Stainless Steel Sink!

Cleaning Hard Water Deposits – YouTube

This is a great video showing the impact of white vinegar on built up minerals.

With Eclipse faucets you can use Scotch Bright pad or Mr Clean Magic Erasure with the vinegar.

The leak he has is the cartridge leak probably from built up minerals. The cartridge is inside the handle and turns the faucet on and off and mixes the hot and cold water.

Tom

https://youtu.be/aOudR7RiDJc

Posted in Uncategorized | Comments Off on Cleaning Hard Water Deposits – YouTube

3 Great Ideas for Decorating Kitchens with White Cabinets

Source: 3 Great Ideas for Decorating Kitchens with White Cabinets

Kitchen cabinets are basically painted in white. That is the usual standard color for every modern kitchen. It is a stunning color but it might seem too bland and barren for some people. At the same time, they would think that changing the color of these cabinets might de-characterize their kitchens and waste a big part of their charm. Here we will teach how to decorate your white-cabinets-kitchen and keep that gorgeous white of these cabinets at the same time.

1- First thing that should come to mind is livening things up a little. Few touches of cheery 3-Great-Ideas-for-Decorating-Kitchens-with-White-Cabinets-4flowery colors will liven things up for your kitchen. You can stick some cut out stickers on the cabinets and the walls to break the barren ambiance of the kitchen. You could use things other than stickers. Some potted plants, colorful hand towels, colorful jars and earthenware pots will give you the colors you need.

2- Use contrast to your Advantage. Contrast is a powerful tool when it comes to modern decor. Therefore, you could paint the kitchen walls in black or use black tiles for a bold striking effect. You could even use white and black tiles for more of that effect in your kitchen. You could also paint the edges of the cabinets in black or use stencil art for that.

3- A little sparkle does wonders. White helps make your kitchen look larger and more well-lit. So why don’t you use other elements with the same strength? Mirrors and3-Great-Ideas-for-Decorating-Kitchens-with-White-Cabinets-5 glass will give your kitchen a classy modern look. A glass rack for example will help you achieve that. A big mirror on your kitchen walls will help you with that as well.

Do not give up on your white kitchen cabinets or repaint them just because they are white. Summon up some creative ideas and you will find that the white of your kitchen is what made you fall in love with it in the first place.


Posted in Uncategorized | Comments Off on 3 Great Ideas for Decorating Kitchens with White Cabinets

How to Paint Your Kitchen Cabinets – Freshome

You paint the walls to make a room feel brand new; why not paint your kitchen cabinets? Here’s how to paint your kitchen cabinets like a pro, step by step.

Source: How to Paint Your Kitchen Cabinets – Freshome

blue-kitchen-cabinetsIf you’re like most people, your cabinets take up the most visible space in your kitchen. That’s great when they’re in good shape; but if they aren’t as beautiful as they could be, we’ll show you how to paint your kitchen cabinets like a pro.

Sure, you could replace your cabinetry, but that’s a pricey undertaking. Just as painting the walls can refresh a room, painting your cabinets can make your kitchen feel brand new, bringing beauty and style back to this heavily used space.

Painting your kitchen cabinets is a budget-friendly choice for design change, but it’s not as easy as you might think — it requires a lot more prepping than painting. If you feel that it’s beyond your DIY comfort level, many professionals would be willing to take on the project. Undaunted? Go for it! Read on and learn how to paint your kitchen cabinets like a pro.

Collect this idea
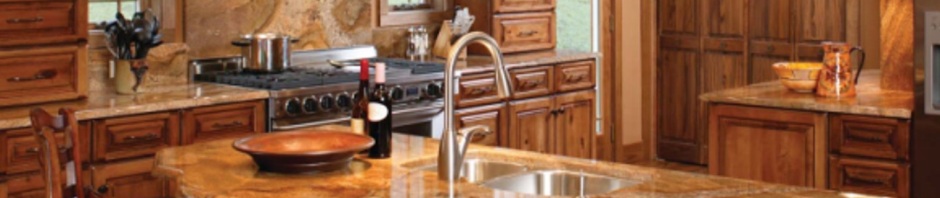
kitchen cabinets tile stove
Painting your kitchen cabinets is a budget-friendly choice for design change, but it’s not as easy as you might think. Image Source: Collaborative Design

Step 1: Plan Ahead
Painting your kitchen cabinets is completely manageable — as long as you have lots of kitchen-cabinets-tile-stovetime, patience and takeout. Make sure you set aside the amount of time required to devote to this project; it’s not a one-day job. Flat-front cabinets are going to be quicker to do than those with raised panels or other details, so plan accordingly.

You’ll need to choose the primer and paint to use. By taking one of the cabinet doors to a paint retailer, you can get set up with the best products for your kitchen. Cabinets require a higher-quality paint than you would use for your walls, so don’t be hesitant to splurge. (You want to paint your kitchen cabinets like a pro, remember?) They suffer daily wear and tear, so it’s best to avoid cheaper paint that may peel, crack and chip.

Collect this idea
teal green painted kitchen cabinets
Painting your kitchen cabinets is completely manageable — as long as you have lots of time, patience and takeout. Image Source: To Do Something

Step 2: Choose Your Color
Just as people often get a little anxious about choosing the right paint color for walls, teal-green-painted-kitchen-cabinetsexpect to spend some time debating your color choice. Think of the design elements in your kitchen that you love — it’s easy to coordinate cabinets with something you already own.

Get lots of samples, paying special attention to the darkest color on the strip; it gives you the best idea of the undertones in that series of colors. You can test what the color will really look like next to your appliances, counters and flooring by priming and painting a large sample, such as the inside of a cabinet door or a poster board.

Vibrant kitchen cabinets, including rich colors such as cobalt blue and cranberry red, are a design trend evidenced all over the internet. Too much? Two-tone cabinets are another stylish option; this means your upper cabinets are neutral (think grey, greige or soft white) and the pop of color is saved for the lower ones.

Pastels work well to brighten up a space, if that palette appeals to you. If all of these color options make you even more anxious, white is one of the most common cabinet colors because of its clean, classic look.

Collect this idea
pale green painted kitchen cabinets
Get lots of color samples, paying special attention to the darkest color on the strip; it gives you the best idea of the undertones in that series of colors. Image Source: Maple and Gray

Step 3: Remove and Label the Doors, Drawers and Hardware
As tempting as it may be to paint your cabinets with the doors and hardware (including hinges) still attached, don’t do it — that “time saver” will cost you in the long run. Remove the cabinet doors and drawers, making sure to label where they came from. A simple piece of masking tape with a location written on it will save you a lot of hassle later.

If you are replacing the existing hardware with new pieces, drill the holes for it at this stage, filling all other holes and spots in the wood. Take the hinges off of the cabinet fronts as well. Storing them inside the now-open cabinet is easy, and they won’t get lost while you are painting.

Collect this idea
kitchen cabinet hinges
As tempting as it may be to paint your cabinets with the doors and hardware (includingkitchen-cabinet-hinges hinges) still attached, don’t do it — that “time saver” will cost you in the long run. Image Source: Home Tips

Step 4: Prep Your Surfaces
No matter how clean your kitchen is, everyone (yes, even you) needs to scrub the cabinet boxes, doors and drawers. Kitchens are work zones, and there is more dirt and grease there than any of us care to admit. Paint will not stick to dirt or grease, so make sure your surfaces are prepped properly.

Mixing one part trisodium phosphate (TSP, found at the hardware store) with four parts water will produce an effective degreaser. Use proper safety gear (gloves and goggles) when handling the cleaner, and give your cabinets a good wipe-down. Allow the cabinets to dry completely before moving on.

Collect this idea
cleaning kitchen cabinets
Mixing one part trisodium phosphate (TSP, found at the hardware store) with four parts water will produce an effective degreaser. Image Source: DIY Network

Step 5: Sand Everything You Are Painting
We know you don’t want to, but you need to lightly sand the painting surfaces to get them ready; paint will not stick to the finish. If you can wipe spills off your cabinets, paint will wipe off, too.

Wood cabinets should be sanded just enough to make the finish matte. If your cabinets have previously been painted and there is no chipping or peeling, then the same idea applies. But if you have painted cabinets with flakes of paint coming off, you will need to get down to bare wood.

No matter how much sanding you are doing, make sure you don’t round or wear down any edges (try a sanding block), and take care to vacuum away any dust. Finish with a tack cloth so no residue remains.

Collect this idea
sanding kitchen cabinets
Wood cabinets should be sanded just enough to make the finish matte.Image Source: Simply Rooms

Step 6: Prime Time
The primer that you select should be high quality and suited for the material of your cabinets (wood, metal, laminate). If you are going to be painting over a dark or stained surface, have your primer tinted to match your desired color. This step is important to keep the original color from showing through your new paint.

Use a dropcloth and painter’s tape to protect your surrounding areas, and use either a roller or paintbrush to apply your primer. Rollers work better for flat surfaces and let you cover a lot of area quickly. If you have a lot of architectural details in your cabinetry, you will be better off using a paintbrush to get into the nooks and crannies.

Collect this idea
priming kitchen cabinets
The primer that you select should be high quality and suited for the material of your cabinets (wood, metal, laminate). Image Source: DIY Network

Step 7: Paint Your Kitchen Cabinets Like a Pro
Finally, it’s time to paint … and wait for the paint to dry. And paint again, and wait for that coat of paint to dry. (Yep, this is the exciting part.) Follow the same method you used for applying primer to your cabinets, whether roller or paintbrush (or a combination of the two). Apply a thin coat of paint, making sure to clean up any drips or pooling, and then wait. This may take a few days, depending on your environmental factors.

When the first coat is completely dry, lightly sand your cabinets, paint another thin coat and then wait (again, this may be days). You’ll need at least two coats of paint; depending on your coverage, you might even need a third or fourth coat (and more days of waiting).

Collect this idea
painting kitchen cabinets
Apply a thin coat of paint, making sure to clean up any drips or pooling, and then wait. Image Source: How to Nest

Step 8: Reassemble Everything
Once the cabinet boxes, doors and drawers dry completely, you’re ready to put your newly fabulous kitchen back together. Resist the temptation to do this too soon; it will result in smears and send you all the way back to Step 5 — and no one wants that.

Now that things are undoubtedly dry, you’ll be glad you took the time to label which door belongs where. If you have new hardware, put it in place as well. Then take a deep breath, stand back and admire your beautiful new kitchen.

Though it’s certainly not the simplest of household projects, you can paint your kitchen cabinets like a pro by following these steps. This could have drawbacks, however; your friends might want you to tackle theirs next.

Collect this idea
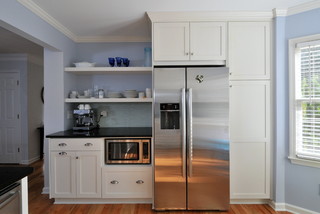
kitchen cabinets island
Once the cabinet boxes, doors and drawers dry completely, you’re ready to put your newly fabulous kitchen back together. Image Source: Steven James

Read more: http://freshome.com/how-to-paint-your-kitchen-cabinets/#ixzz3n9rEt768
Follow us: @freshome on Twitter | freshome on Facebook

Posted in Uncategorized | Comments Off on How to Paint Your Kitchen Cabinets – Freshome